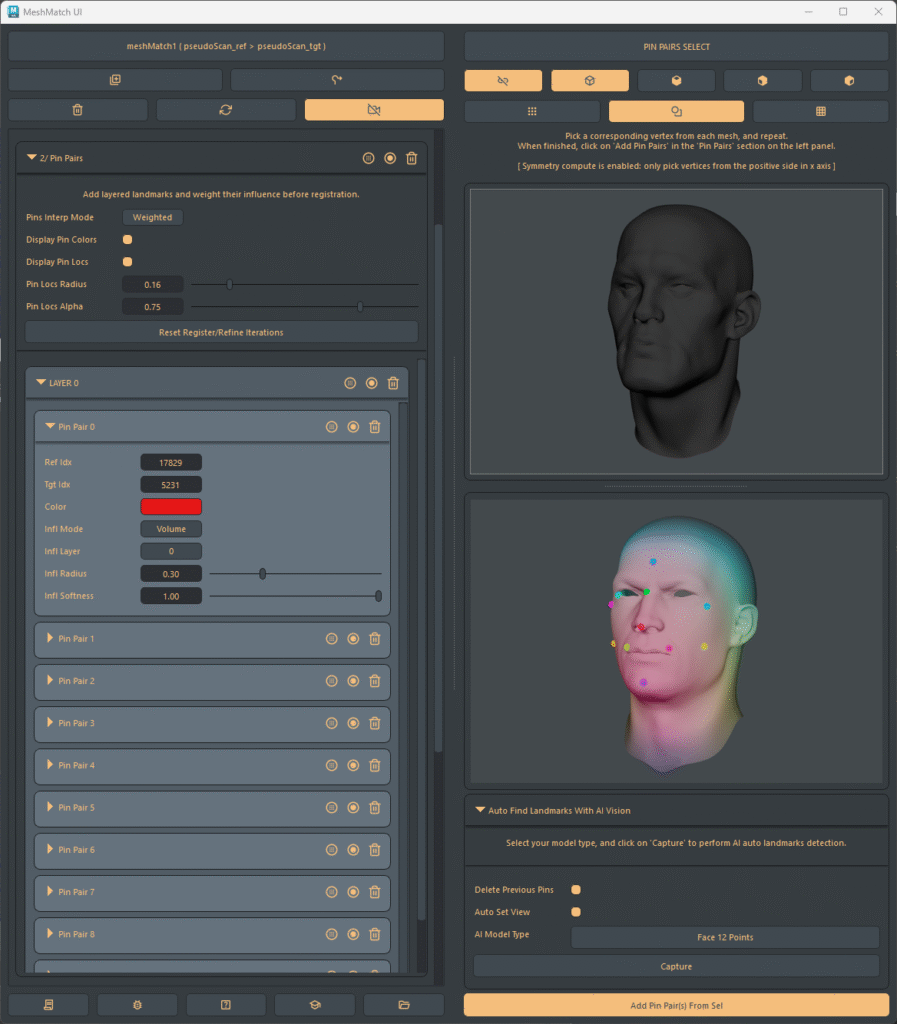
While the plugin is optimized to minimize the need for custom landmarks, manually adding “pins” is straightforward and can accelerate achieving optimal results. Pins are not just point correspondence between the meshes, but a whole deformer system that you can weight and customize in various ways in order to guide the registration. Pins can be added in layers for complex matches.
The UI provides a side panel with two views that simplify the vertices pairs pick process.
Right Panel Features
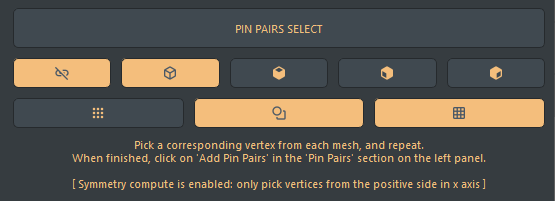
- View Synchronization:
The right panel views are synchronized by default, and even if the meshes are positioned differently, the viewports remain coordinated. You can deactivate this behavior by unchecking the Synchronize Views button, and this will be saved in your preferences. - Camera orientation buttons:
You can set 4 orientations for the cameras, ‘perspective’, top, ‘front’, ‘side’. This setting will be saved in the preferences as well. - Component / object mode buttons:
You can set the selection mode by toggling these buttons, allowing either to pick vertices for new landmarks, or pick the existing ones by selecting the colored spheres. - Wireframe display button:
Toggles wireframe display on meshes.
Selecting one of the existing pin display spheres will expand the related pin pair properties on the left panel for edition.
Adding Pin Pairs:
Access the Pin Pairs Tool:
Open the Pin Pairs section from the left panel. Then, click the camera icon in the top-right to reveal the side view. You may also use any of Maya’s regular viewports—as long as you select one vertex from the reference mesh, then one from the target mesh (or one for target mesh, then one from reference), alternating consistently. You can also use the automatic landmarks feature described in the next chapter.
Note for symmetrical Meshes:
If symmetrical computation is enabled, select pin pairs only from the positive side. The solver will automatically mirror the selections to the other side.
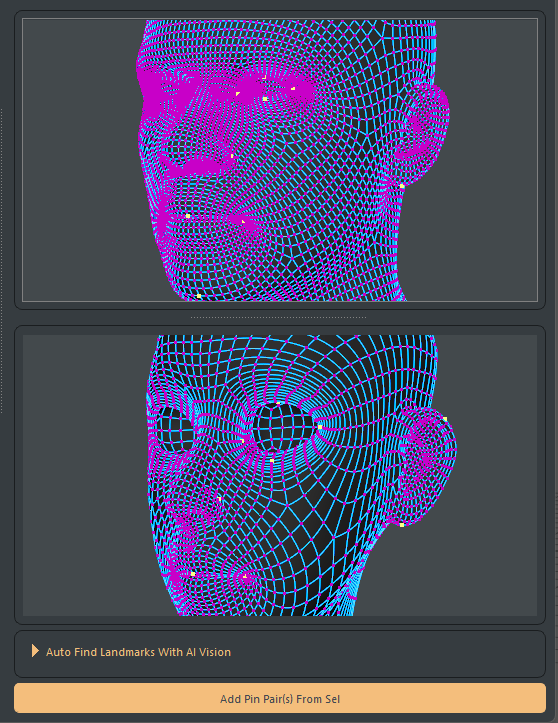
Automatic Landmarks Detection:
Mesh Match can automatically detect landmarks on human faces and bodies using AI vision, so this feature can be used for adding pin pairs without manually selecting them in the views.
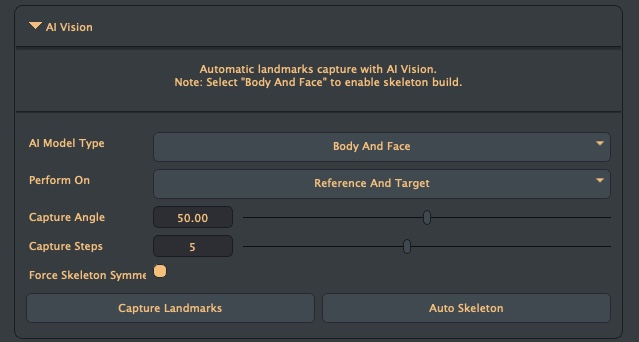
To use this feature, expand the “Auto Find Landmarks With AI Vision” panel located at the bottom and set the options:
- AI Model Type:
Face detection can identify up to 468 points. For this tool, there are four presets available: 12, 25, 50 points for faces, or ‘Face + Body’. Using the 12-point preset for faces is recommended. You can then manually add extra points for areas like the ears, skull, and neck if needed. - Perform On:
This allows you to customize on which mesh the AI capture is performed. For the pin pairs addition, you will need to set the menu to ‘Reference And Target’. - Capture Angle:
For more accuracy, the process will take multiple snapshots of the mesh in order to find the regions of interest and keypoints.
The capture angle sets the spread of the capture iterations, around the Y axis of the camera. For example, a value of 50 will make the camera rotate from -25 to +25 degrees around the model. - Capture Steps:
Represents the amount of snapshots that will be performed within the capture angle. - Capturing Landmarks:
Once you’ve configured these options, click “Capture”. This will perform the landmark detection and select the corresponding vertices on your meshes. You can adjust your views and re-run the capture multiple times before finalizing and adding the pin pairs.
More information about the auto skeleton build can be found here.
Note: You can customize your own face detection indices by calling the meshMatchDetectLandmarks dedicated command documented here.
After selecting your vertex pairs:
Click Add Pin Pairs From Sel at the bottom.
Go back in the pin pairs section from the main panel, select the interpolation mode and weight the deformation if necessary.
At this point, the mesh will update to display the influence of the pin’s, and you will need to use the various attributes from the main panel in order to customize the deformation.

Main options:
- Pin Interp Mode:
Default: Weighted | options: Weighted/RBF
Defines the interpolation of the whole mesh between pinned points:- When set to weighted, the pins act as weighted deformers that can be organized in layers with influence options.
- When set to RBF, the mesh will globally be interpolated with a Radial Basis Function, and you’ll have an additional option to select between linear or spline interpolation. For optimal results with RBF, ensure your points are evenly distributed across the entire mesh.
- Display pin colors:
Toggles the display of influence coloring on the mesh vertices. Note that with RBF interpolation, the influence will not be displayed. - Display Pin Locs:
Toggles the display of the pin spheres. - Pin Locs Radius:
Controls the size of the selection spheres. - Pin Locs Alpha:
Controls the transparency of the selection spheres.
Reset Iterations Button & Live Landmark Weighting:
The Reset Iterations Button allows you to control how processing iterations affect landmark adjustments:
- Manual Reset:
Clicking this button sets both registration and refinement iterations to zero. This is useful when adding, removing, or significantly weighting landmarks, providing a smoother, more responsive experience. The button stores your current iteration settings; clicking it again will restore those saved values. - Automatic Live Weighting (Sliders):
If you adjust a landmark’s weight using a slider without first clicking the “Reset Iterations Button,” the system provides live feedback.- On Click & Drag: When you click and begin dragging a weight slider, the iterations are temporarily reset to zero. This allows you to see the direct impact of your weighting changes in real-time as you move the slider.
- On Release: Once you release the slider, the iterations automatically revert to their previously set values, and the system will re-process with those settings.
Best Practices:
- Incremental Addition: It’s recommended not to add too many landmarks at once. Often, a couple of well-placed landmarks are sufficient. Adjust their weights, run the registration for 10–15 iterations, and then add more if needed.
- Unsmooth the mesh: Like for any other deformer weighting in Maya, you will have a much better experience if you deactivate the smooth mesh display during this weighting phase.
Section bar buttons:
Landmarks (‘Pin Pairs’) are sorted by layer and index.
For each section, you will find 3 buttons in the main bar:
- Select Vertices:
Select the vertices for all the pairs, or the current layer pairs, or the current pair. - Select Pin Locs:
Select the display locators for all the pairs, or the current layer pairs, or the current pair. - Delete:
Delete all the pairs, or the current layer pairs, or the current pair.
Pins Parameters:
- Ref Idx:
The vertex ID on the reference mesh. This index can also be changed manually. - Tgt Idx:
The vertex ID on the target mesh. This index can also be changed manually. - Color:
A display color used to visualize influence weights. A random color is assigned by default. - Influence Radius:
Default: 0.5 | Min: 0 | Max: 1
Defines the maximum distance over which the pinned influences the mesh. A value of 1 covers the entire mesh. - Influence Softness:
Default: 0.5 | Min: 0 | Max: 1
Controls the decay spread of the influence. A value of 0 results in a sharp transition beyond the maximum distance, whereas 1 provides a gradual transition across the influence distance. - Influence Mode:
Default: Volume | options: Volume/Surface
Specifies whether the influence is applied throughout the volume or along the mesh surface. - Influence Layer:
Default: 0 | Max: infinite
This parameter lets you assign influence layers to progressively refine the deformation.
Layer 0 serves as the default base layer, and deformations from landmarks in higher layers are applied cumulatively on top of previous ones. Within any given layer, overlapping influences are normalized, while areas not affected by any influence remain in their initial position.
IMPORTANT:
If you don’t have a satisfying result with less than 5 to 15 landmarks – for most complicated cases, it means that you need to review your setup again. Try different locations, weighting and layering.
The layering and weighting parameters should allow you to perform a sufficient alignment for the registration with very few landmarks.